Mure Denoise
Noise reduction can make a huge difference in an image. Unfortunately, it is often over used and the results end up looking very artificial. Furthermore, noise reduction routines can leave artifacts that are worse than the noise.
This is one of those areas where it is almost certainly better to under do it, than over do it.
I can often tell a tyro at processing because of their very heavy hand in this area.
There are many possible ways of doing noise reduction with PixInsight and they all have their advantages and disadvantages. I'm going to start off with the MureDenoise script. This script has the virtue of having only a few parameters. Furthermore, the correct value of some of those parameters can be determined using another simple script, MureDenoiseDetectorSettings. It and the MureDenoise script are both located under Script->Noise Reduction.
This is what MureDenoiseDetectorSettings looks like before being filled in:
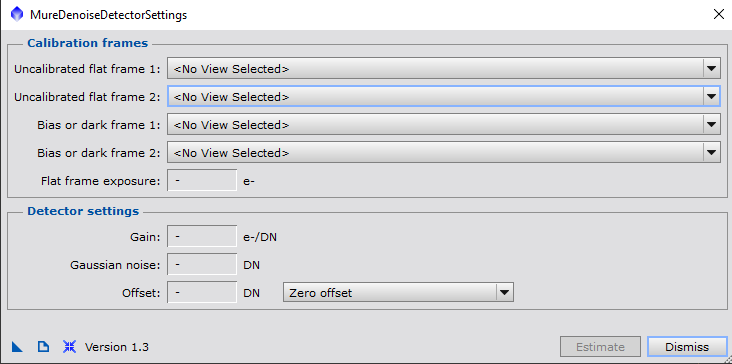
MureDenoiseDetectorSettings Script When First Brought Up
To use this script, you will need 4 different uncalibrated files:
I haven't given you the files you need for the tutorial to do this, but you can and should do this for your own camera for use with your own images.
- Two different uncalibrated flat files
- Two different uncalibrated bias or dark frames
I haven't given you the files you need for the tutorial to do this, but you can and should do this for your own camera for use with your own images.
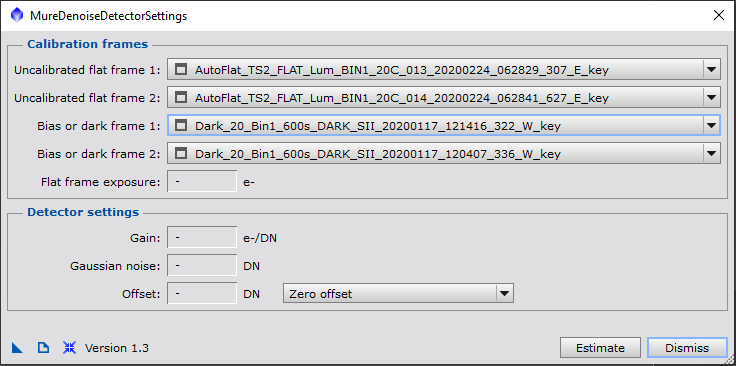
MureDenoiseDetectorSettings Filled In
I have now filled in the form. The Flat frame exposure field looks like you need to fill it in, but you don't. Because we will be using MureDenoise on already calibrated images, we leave the drop down box at "Zero offset".
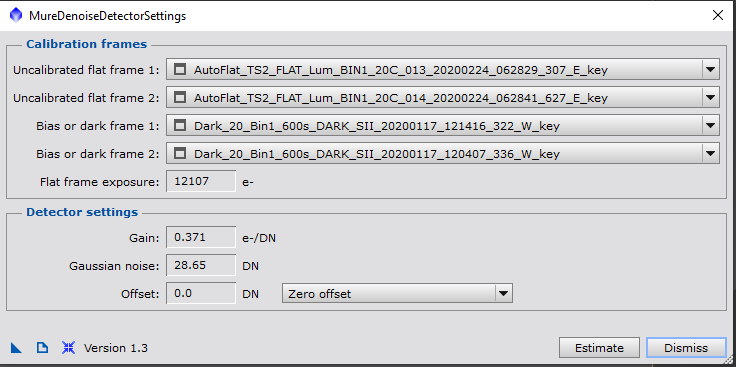
MureDenoiseDetectorSettings Results
After pressing "Estimate" button, the form fills in with some values we need for using MureDenoise. If you are interests in comparing claims by the manufacturer for your camera vs the reality, you can do that.
For my camera the manufacturer claims:
The gain is exactly as advertised. The read noise can be calculated by multiplying the Gaussian Noise by the gain.
28.65 DN * .371 e-/DN = 10.63 instead of 9.3 so slightly higher than advertised. To be fair to the manufacturer, they do say it is approximate.
Now bring in the Master luminosity image and do a STF auto-stretch, [ctrl]a. You can do this on either the true master or the version that DynamicCrop version that you saved. I'm going to use the true master.
For my camera the manufacturer claims:
- Gain of .37 e-/ADU
- Read Noise of 9.3 e-
The gain is exactly as advertised. The read noise can be calculated by multiplying the Gaussian Noise by the gain.
28.65 DN * .371 e-/DN = 10.63 instead of 9.3 so slightly higher than advertised. To be fair to the manufacturer, they do say it is approximate.
Now bring in the Master luminosity image and do a STF auto-stretch, [ctrl]a. You can do this on either the true master or the version that DynamicCrop version that you saved. I'm going to use the true master.
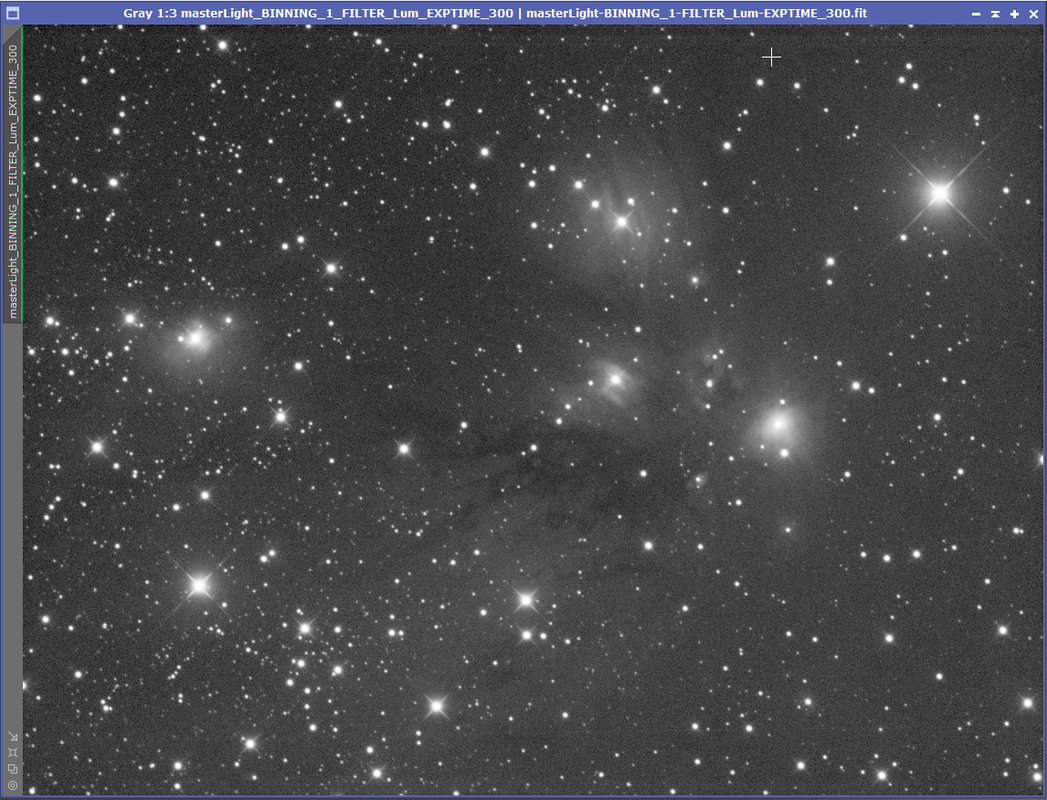
Luminosity Master before Any Noise Reduction
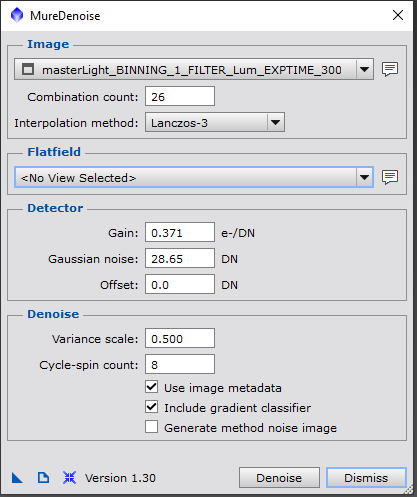
MureDenoise Script Filled In
And here is the MureDenoise script under Script->NoiseReduction filled in with the values we found in MureDenoiseDetectorSettings. A cpuple of things to note:
This brings us to the Denoise section of the MureDenoise Interface. Cycle spin count affects how many iterations are used to derive the final result. 8 is the default and in practice works well. As with many things that iterate, the trade off is quality vs time. 8 gives high quality results without taking an inordinate amount of time.
Check "Use image metadata" if it is not checked.
You should also check "Include gradient classifier". This gives better results although it does take longer.
Generate method noise image can be left unchecked unless you are curious. It won't affect the results.
Variance Scale is VERY important. A value of 1. tries to remove this scripts best estimate of the noise. In my experience leaving this value at 1.0 leads to undesirable artifacts once you try to stretch the image, especially if you are a pixel peeper. For example, it leads to artifacts around the stars. In keeping with my philosophy that it is better to under due noise reduction than over do it, I often run with values of around .5. This is something you should experiment with when using your own equipment and images.
And again, just to emphasize this, you need to use the MureDenoiseDetectorSettings script to find the correct settings for your camera/gain setting combination.
Now that we have filled everything in, it is a simple matter of hitting the "Denoise" button. The result should look much less noisy.
- When I pulled in the master with the drop down box, it filled in how many subs were used to create the master. It is important this number is correct.
- Interpolation method must match that used to register the images. A tool tip gives more information. If you use the BatchPreprocessing or WeightedBatchPreprocessing scripts Lanczos-3 is generally what you would have used.
- If you have the flat you used in calibrating to make the master, you can use that if you have not cropped the image yet. It must match the size of the master or you cannot use it. In general, it makes little practical difference if your vignetting is not large.
This brings us to the Denoise section of the MureDenoise Interface. Cycle spin count affects how many iterations are used to derive the final result. 8 is the default and in practice works well. As with many things that iterate, the trade off is quality vs time. 8 gives high quality results without taking an inordinate amount of time.
Check "Use image metadata" if it is not checked.
You should also check "Include gradient classifier". This gives better results although it does take longer.
Generate method noise image can be left unchecked unless you are curious. It won't affect the results.
Variance Scale is VERY important. A value of 1. tries to remove this scripts best estimate of the noise. In my experience leaving this value at 1.0 leads to undesirable artifacts once you try to stretch the image, especially if you are a pixel peeper. For example, it leads to artifacts around the stars. In keeping with my philosophy that it is better to under due noise reduction than over do it, I often run with values of around .5. This is something you should experiment with when using your own equipment and images.
And again, just to emphasize this, you need to use the MureDenoiseDetectorSettings script to find the correct settings for your camera/gain setting combination.
Now that we have filled everything in, it is a simple matter of hitting the "Denoise" button. The result should look much less noisy.

Result after running MureDenoise
Note that after running MureDenoise, if you should do another auto stretch with [ctrl]a, the image will be stretched harder than before and will again look more noisy. That is normal.

MureDenoised Image after Doing a New Auto Stretch
When stretching images there is a tradeoff between how highly stretched the image is, and how much apparent noise you see.
If you do check the "Generate method noise image" check box, the Process Console will contain some stats about the image.
If you do check the "Generate method noise image" check box, the Process Console will contain some stats about the image.
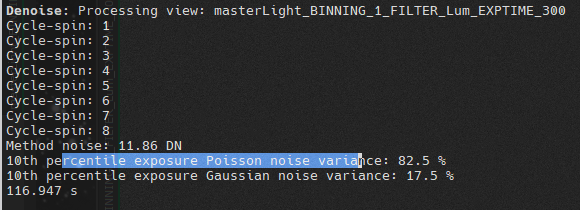
MureDenoise Process Console Stats with "Generate method noise image" Checked
This information can be useful as an indication of whether you are at a Sky Limited exposure time or not. Values of Gaussian noise variance below 10% indicate that the noise is dominated by sky noise. The general advice is to shoot for between 10% and 20% with 10% being slightly better. The result is that in terms of noise, I would be slightly better off taking somewhat longer but fewer exposures to reach the same total integration time.
However, there is always a trade off. The practical difference is between 17.5% and 10% in practice is pretty small. And it comes at the expense of blowing out (fully saturating) more stars. In other words, pick your poison.
It should also be noted that I could have made this number much better by going to a more light polluted sight. The number would have been better, but the image much worse.
To get an idea of how much worse I am doing, the difference in efficiency between shooting with an ideal camera and a real camera is given by
SQRT(x/(x + Read Noise^2)). x is the background sky level.
So let us say my read noise squared is 10% of my background sky. To get sky limited I want the sky at 10x that amount or 100. x in this case is 100. Plugging the numbers in we get:
SQRT(100)/)(100+10)) = SQRT(100/110) = .953
Here I am pretending my camera has read noise^2 of 10. If I make it 20 the same thing happens. The math is now
SQRT(200/(200+20)) = SQRT(200/220) = .953
So if I had reached 10% as my goal, I would be 95.3% as efficient as an exposure with an ideal camera with no read noise.
Now, let us do the math with 20%. My sky would need to be 5 times as big (1/.2). So that gives an x of 50.
SQRT(50/(50+10)) = SQRT(50/60) = .912
So by being at only 20% I would be only 91.2% as efficient as a ideal camera with no read noise.
The bottom line is if you are getting a 10% percentile exposure Gaussian Noise Variance of less than 20% you are fine although 10% is very slightly better.
