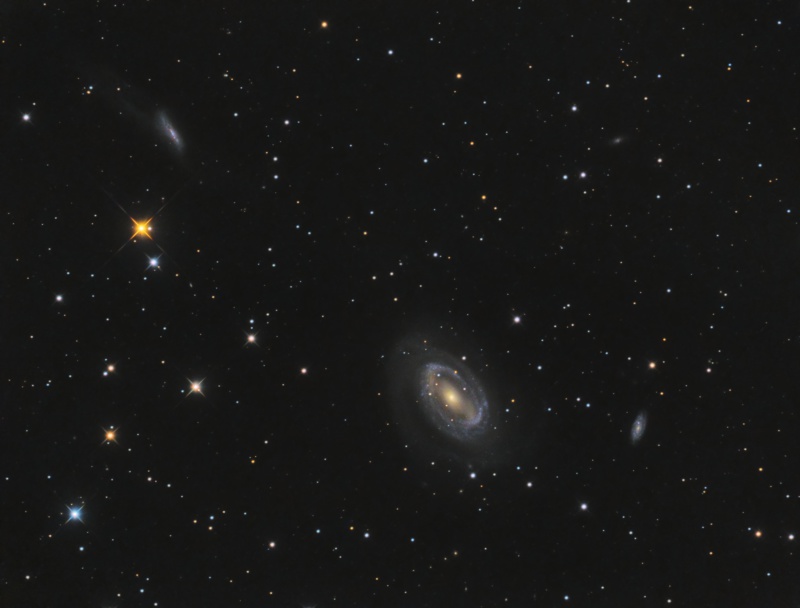
NGC 4725
Getting Good Color:
One of the areas I really struggled with starting out was getting good color in my images. In fact, it was difficult for me to get much color at all, let alone good color.
Here is what one of my early efforts looked like:
One of the areas I really struggled with starting out was getting good color in my images. In fact, it was difficult for me to get much color at all, let alone good color.
Here is what one of my early efforts looked like:
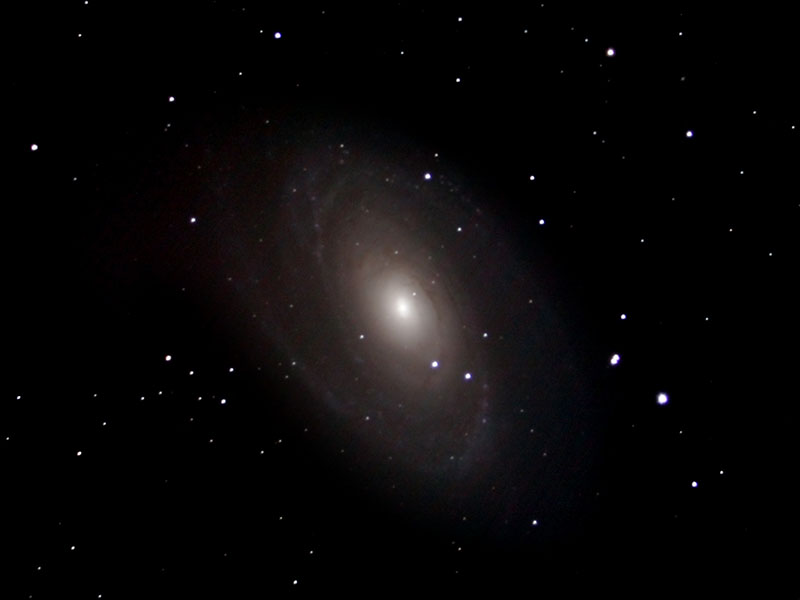
Messier 81
Honestly, that is pretty pathetic. Messier 81 has beautiful blue spiral arms, a wonderful yellow core, and plenty of stars with nice color around it. None of that comes through in this image. I didn't know if the light pollution at my site was washing out all the color, or what. However, I suspected the problem was simply I didn't know how to process what I had properly. I asked for help on the Cloudy Night forums and received a bunch of advice. Unfortunately, I still didn't know where my problem or problems were.
With time, I gradually worked things out but it was a painful process. Hopefully, I can spare you at least some of the frustration and speed you along the way. First I'll list what the problems were, and then I'll address them.
The Problems:
o My underlying color data wasn't very good.
o I wasn't color calibrating it properly.
o I was trying to saturate my data at the wrong time.
o I was stretching my color data too much.
o I was trying to combine it with my luminosity data in a poor way.
My Underlying Color Data Wasn't Very Good:
When I first started out I was using a DSLR. Later I switched to a SBIG STF-8300 Mono CCD camera with Baader color filters. In both cases, I wasn't getting very good color data. At a very minimum, you want to get enough that you can use advanced stacking techniques like sigma clipping, or even better, Winsorized Sigma clipping. In terms of the later, you need at least 8 subs for it to work well. More is better. Also, you need enough integration time. Just taking 8 subs at 30 seconds is not going to give you great results. You will be saturating the data. You will be stretching it. Both will emphasize any noise.
Currently, I try to get at least 9 subs of 5 minutes each for each color channel (R, G, and B). Just getting that data requires 45 minutes * 3 = two hours and fifteen minutes. Starting out, I often wouldn't spend that much time on the object, let alone getting the color data. I prefer to get an hour on each channel for 3 hours total. On my current project, I am trying to get 2 hours on each channel!
The point isn't that you have to spend this much time. But spending too little time will hamper your efforts. And definitely try to get enough subs in each channel to allow the better stacking methods.
A second issue is light pollution filters. I don't use one and haven't. You may well be in a situation where you must use one. Just be aware that they can throw off your color balance it ways that are not easily recovered. A frequent manifestation of this is the color of galaxy cores. They end up looking orange instead of a nice yellow. Some people advocate shooting the color data without a light pollution filter and only shooting luminosity data with one.
Finally, you can ignore the next issue if you are using a DSLR since it won't apply. When I started out with my mono camera, I was shooting my luminosity data binned 1x1 and my color data binned 2x2. The theory was that since it was binned 2x2 it was building up 4 times as fast. There is some truth too that. But:
a) Assuming you are shooting subs that are long enough your read noise has only a small influence (and you should be), you can always bin after the fact and the image will not be much noisier at all.
b) I was finding that it would not align very well with my L data leading to bad artifacts around stars, etc.
I'm much happier with my color data since I started binning it 1x1. A side benefit is that you can extract luminosity information from you color subs. On some objects, even if you are using a mono camera, there will be no need to shoot L data at all. This is common for star clusters, both open and globular.
I Wasn't Calibrating It Properly:
For a lot of reasons, it is likely that the data coming out of your camera has color shifts involved. In order to get good color, you have to do something to calibrate the color and shift it back where it needs to be. The exact process for doing that is going to depend on your post processing software. You should also be aware that there are different theories about how this should be done. For example, some people advocate shooting a G0 star which should be neutral. Then you figure out what needs to be done with your equipment to get that neutral color (for example you can adjust the amount of exposure time you spend on each color filter in a mono camera). Others (PixInsight) feel that color is somewhat subjective anyway and it is more important to achieve a result that looks good.
I'm going to show a method that is used in PixInsight. However, I want to mention a nice piece of free software that exists called Regim. It basically takes the G0 star approach. But the way it does it is quite slick and after the fact. Say you took the picture of Messier 81 above. You would tell it that you took a picture of M81 and to search some distance in arc-minutes around it. They it will download data from a database about the various stars that are nearby. Then it will match those stars to the ones in your image. After doing that, it will then adjust the colors so the stars in the image are colored correctly. While I typically use the PixInsight method, there are times I simply cannot get a good result using it. I then will move over to Regim and give that a try. In general I prefer the rendering from PixInsight, but sometimes Regim will simply do a better job.
Here is the unstretched color data for NGC 4725 after gradients have been removed. A Screen Transfer Function has been applied so the data is visible.
Color Data for NGC 4725 Before Calibration
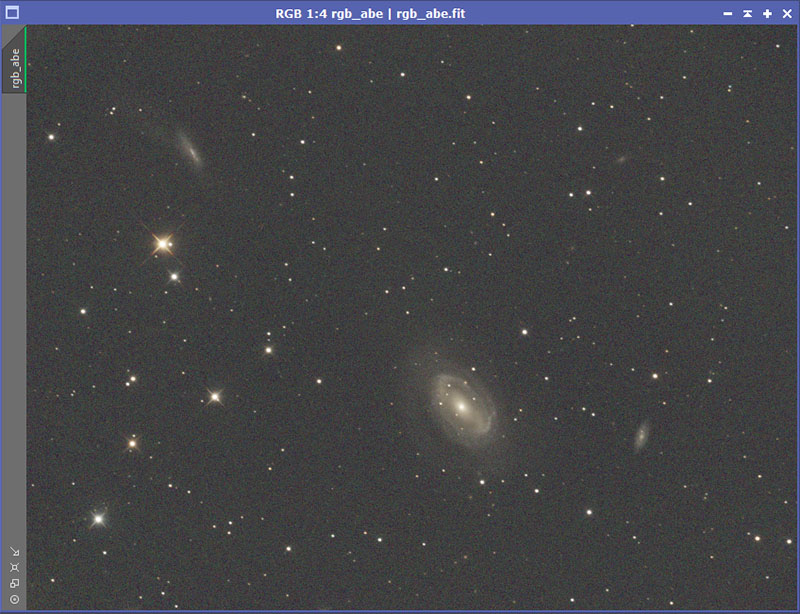
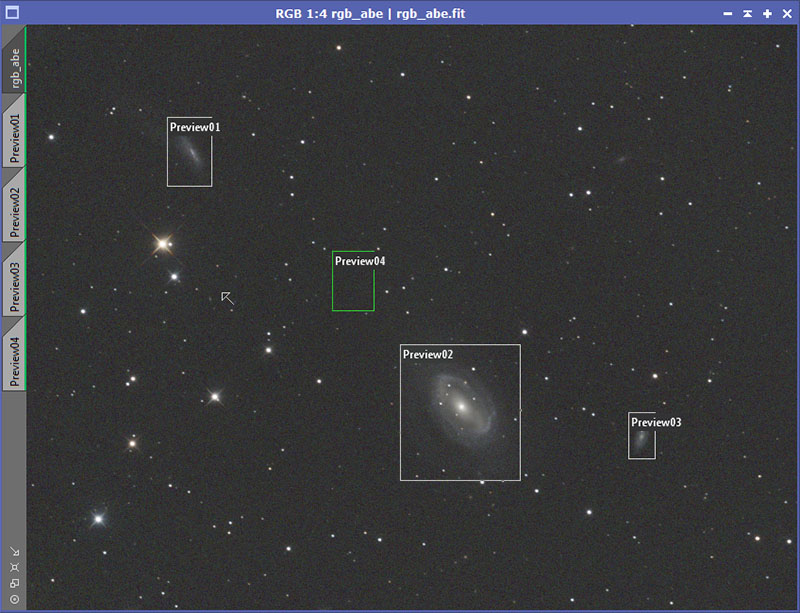
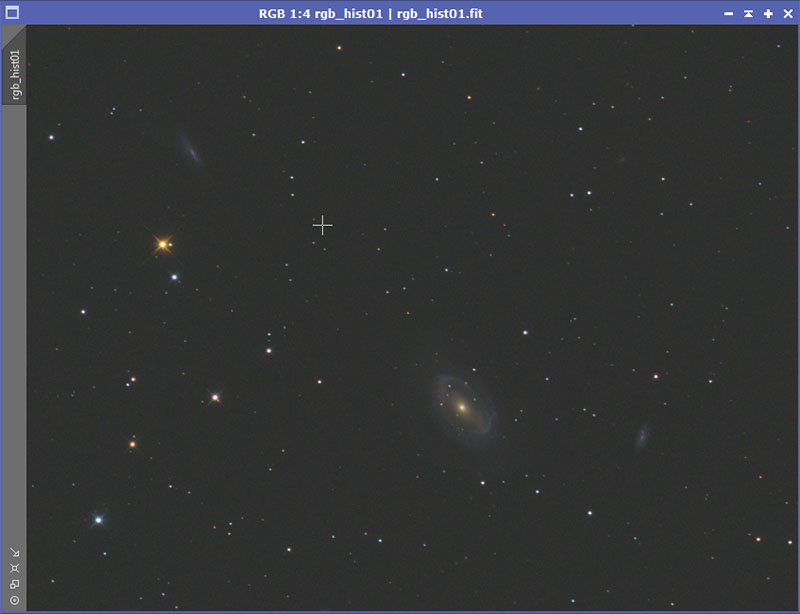
This looks only slightly better than the very bad Messier 81 above. Now a couple of preview areas need to be defined. In this case I will define previews (using [ALT]n over each of the galaxies and another over empty background.
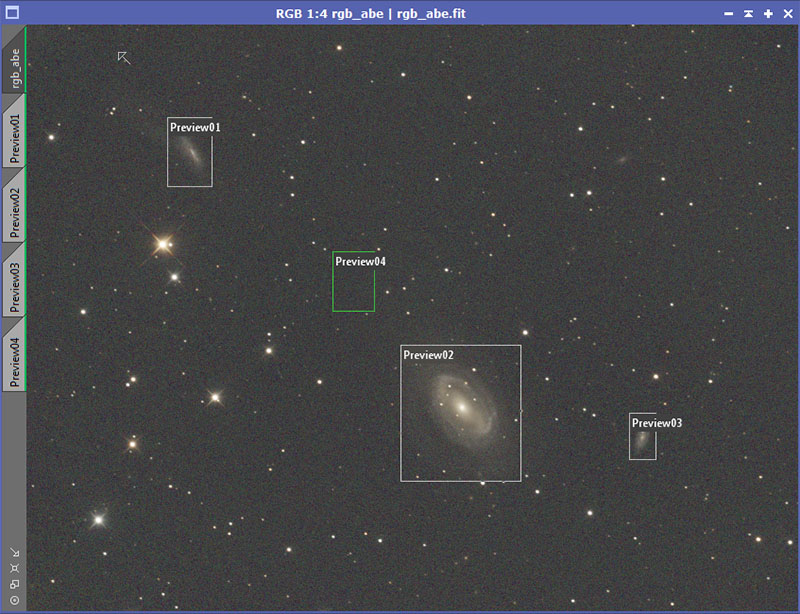
Previews Defined
The PreviewAggregator script under scipts->utitlies is then used to create an aggregate of previews 1, 2, and 3 (not 4).
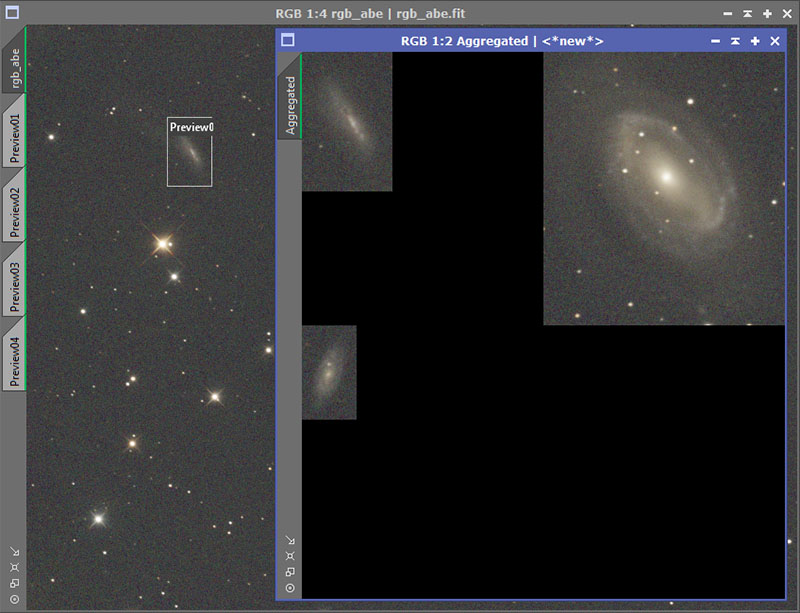
Previews 1-3 Aggregated
It is now time to color calibrate the data. Bring up the ColorCalibration process. Set the reference image to the aggregate of the previews. Set the background to your preview around the background (4 in my case). Make sure that structure detection is turned OFF (unchecked). That tells PixInsight to balance based on the color of galaxies as a whole in the reference image (the aggregate) instead of using stars. In other images, using stars would work quite well. But here the galaxies are what we care about most.
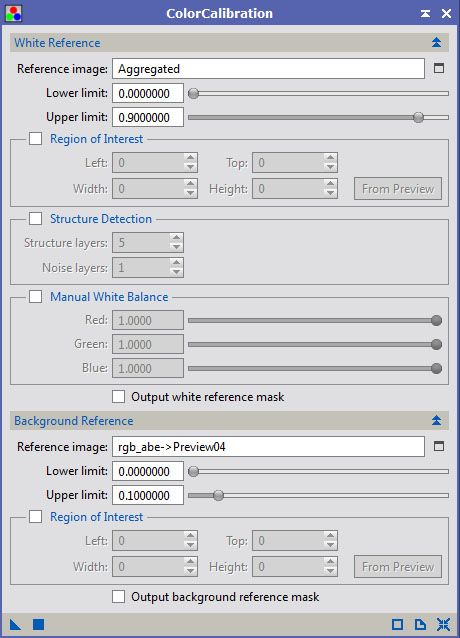
Color Calibration Settings
Now apply the ColorCalibration process to the color data by dragging it over the color image. This is what I get.
Color Calibration Applied
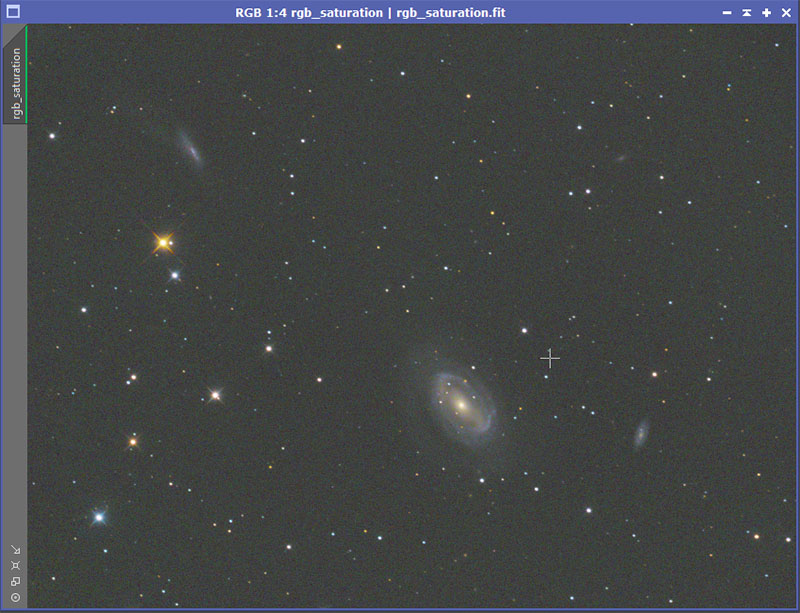
While the color here still looks quite anemic, this is definitely a step in the right direction. The arms of NGC 4725 are taking on a distinct blue color. There is also some color that is starting to show up in the stars. Some look slightly yellow or orange. Others look slightly blue.
I Was Trying to Saturate My Data at the Wrong Time:
Those who have read my PixInsight Tutorial may recall that in the tutorial, I saturate the image after I have stretched the color data and it is no longer linear. Although the result is OK, I am now convinced it is better to saturate the data before it is stretched. To understand why, some light practical theory is necessary.
When you stretch data, all the channels are made brighter. If you stretch it enough, you could end up with something that has RGB values of 250, 252, and 255. That will look almost pure white. Lest you think that is extreme and never happens in practice, that often happens when stretching astrophotos, especially with stars. You might start off with in an unstretched image with what looks like a blue star, but by the time you finish stretching it, it will look practically white.
Landscape photographers know this truth and apply it in a different way. When they take sunset photos, they will often set the camera to be -1 or even -2 stops from what the camera meter says the picture should be. This allows them to take a much more color sunset photo because all the colors haven't been stretched to the point of looking like pale shades of white. By saturating the data before it is stretched, the color data in the original photo is still intact and can be brought out, just like the color data in the sunset.
When saturating the image it is also important to use masks (as was done in the PixInsight Tutorial). Otherwise you will end up emphasizing any color shifts/gradients in the back ground. You probably don't want that to happen unless you're deliberately trying to travel the less traveled path (I would say it is less traveled in this case for a reason).
For my mask, I usually have already processed my luminosity data at this point. I simply bring that in and then clip the blacks somewhat. Alternatively, I can extract the L data from the color data, stretch it, and use that as a mask. Make sure your mask is actually stretched and not just made visible with a STF. Here is the mask I will use on this data.
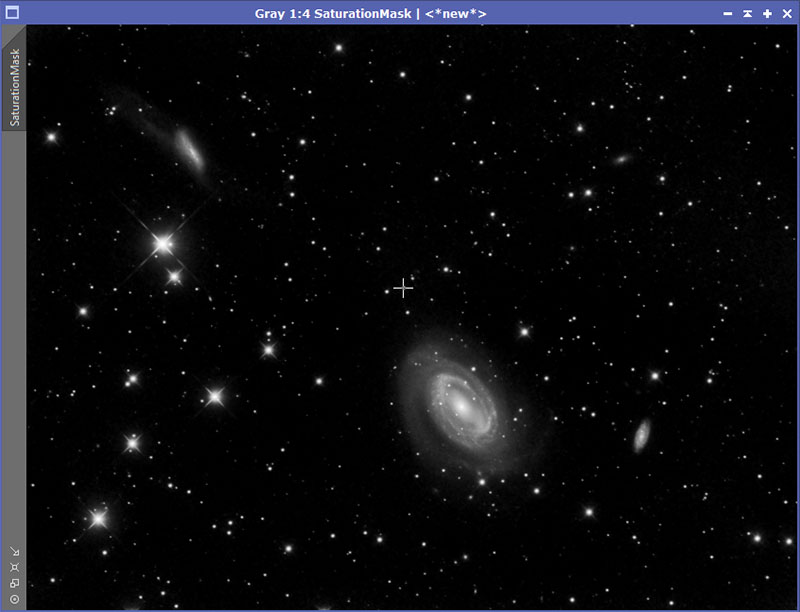
Saturation Mask
After applying the mask to the unstretch RGB data and setting the mask so that while applied, it does not show, I then use the curves tool in PixInsight to saturate the image. I do this in several stages for more control. I went over this process in the PixInsight Tutorial. Here is my first go at saturating the color data.
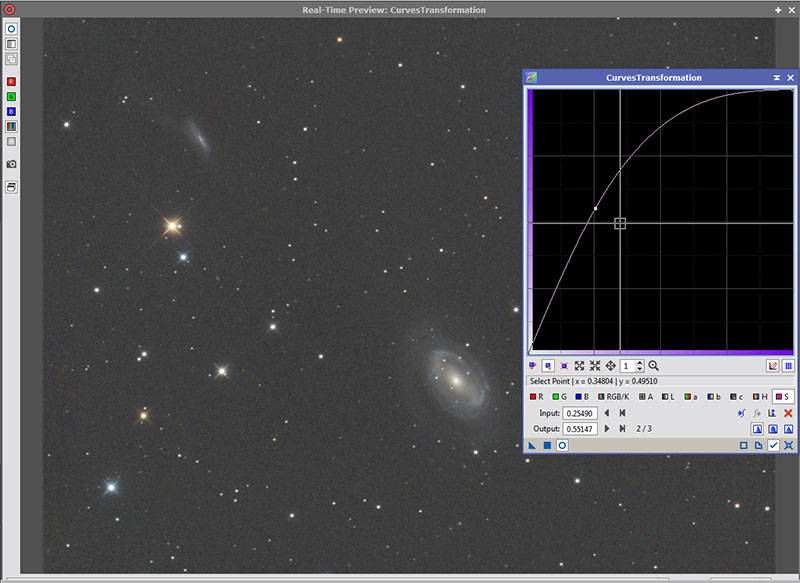
First Application of a Saturation Curve
Now we are getting somewhere. The stars are starting to show some nice color. The arms of NGC 4725 are showing a more distinct blue and the core is starting to have a nice yellow tint (as it should). Also notice that because I used the mask, the background is not growing more saturated. What I am actually showing here is the real time preview. I will then apply this to the actual data and repeat this step to taste. Here is what I finally come up with.
The Color Data After Saturation
I Was Stretching My Color Data Too Much:
Now that the color data has been saturated, it is time to stretch it so that it is no longer linearly. And here I was making another mistake. I was stretching it too much. Again, if you do so, you end up losing those nice saturated colors, just as with the sunset example given earlier. You do not need to stretch it as much as you would the L data. You just want the color data stretched enough so that it will combine well with the L data. There are various stretching techniques and anyone reading this has probably already got that portion of processing down to at least some moderate level of competence so I am going to skip the steps. However, this is what I ended up with. Note that it is still fairly dark.
Now that the color data has been saturated, it is time to stretch it so that it is no longer linearly. And here I was making another mistake. I was stretching it too much. Again, if you do so, you end up losing those nice saturated colors, just as with the sunset example given earlier. You do not need to stretch it as much as you would the L data. You just want the color data stretched enough so that it will combine well with the L data. There are various stretching techniques and anyone reading this has probably already got that portion of processing down to at least some moderate level of competence so I am going to skip the steps. However, this is what I ended up with. Note that it is still fairly dark.
The Color Data after Stretching
After stretching, I also apply noise reduction. In PixInsight I use TGVDenoise. I apply it quite heavily, much heavier than I would ever apply it to the L data. However, make sure that you don't end up destroying the color in the small stars, something that is easy to do. Here are some typical settings I would use for this.
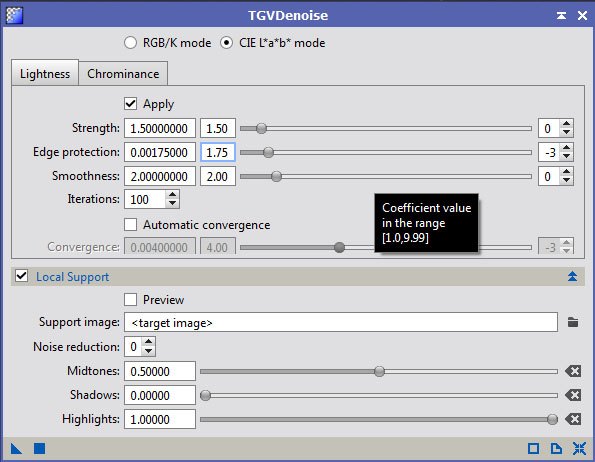
Lightness Settings in TGVDenoise
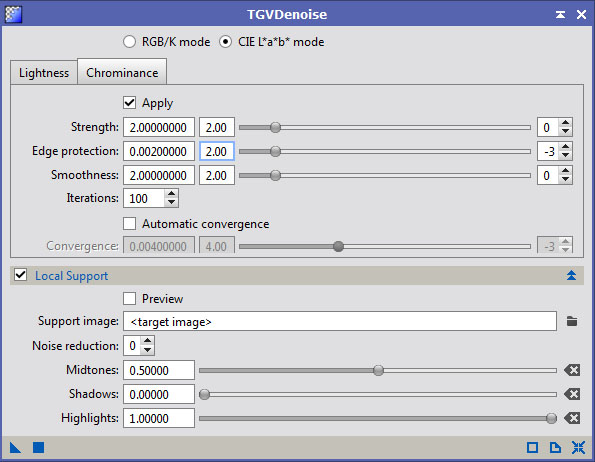
Chrominance Settings in TGVDenoise
Here is the result once applied.
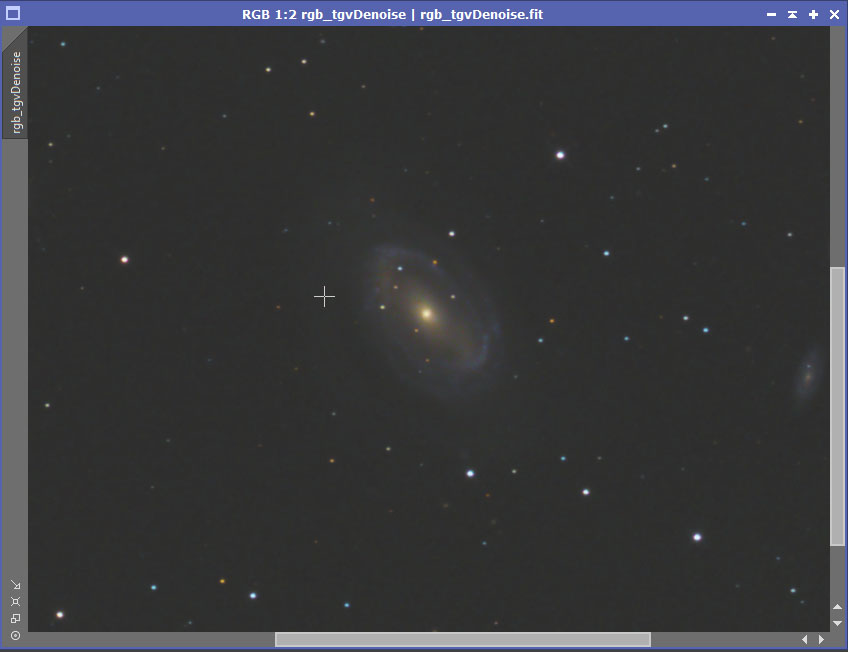
Color Data with TGVDenoise Applied
Here I will sometimes tweak my stretch by moving the black point in somewhat and do a very mild stretch.
I Was Trying to Combine It with My Luminosity Data in a Poor Way:
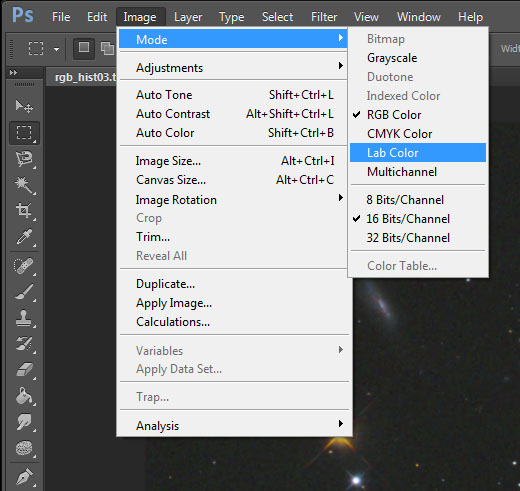
If you have read my PixInsight Tutorial, you know that the normal way of combining the L data with the RGB data is to use the LRGB Combination Tool. While that works well with some images, others (especially things like emission nebula) are problematic at best, even using the sliders for lightness and saturation. I'll admit the problem might be on my end. But I have found a technique that works well for me. Unfortunately, it means using another tool. Photoshop is capable of doing this but other post-processing tools that allow manipulating things in Lab Color are capable of doing it too.
The basic idea is that I convert the RGB data into the Lab color space. Then I substitute the L data I want to use for the Lightness channel in the color image. Then I convert back into the RGB color space.
First, convert to Lab Color.
I Was Trying to Combine It with My Luminosity Data in a Poor Way:
If you have read my PixInsight Tutorial, you know that the normal way of combining the L data with the RGB data is to use the LRGB Combination Tool. While that works well with some images, others (especially things like emission nebula) are problematic at best, even using the sliders for lightness and saturation. I'll admit the problem might be on my end. But I have found a technique that works well for me. Unfortunately, it means using another tool. Photoshop is capable of doing this but other post-processing tools that allow manipulating things in Lab Color are capable of doing it too.
The basic idea is that I convert the RGB data into the Lab color space. Then I substitute the L data I want to use for the Lightness channel in the color image. Then I convert back into the RGB color space.
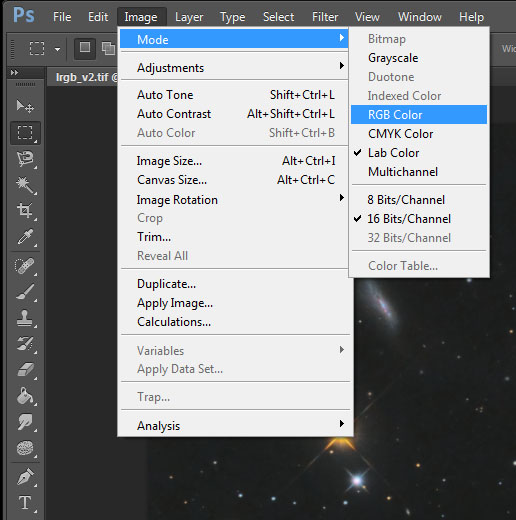
First, convert to Lab Color.
Convert to Lab Color
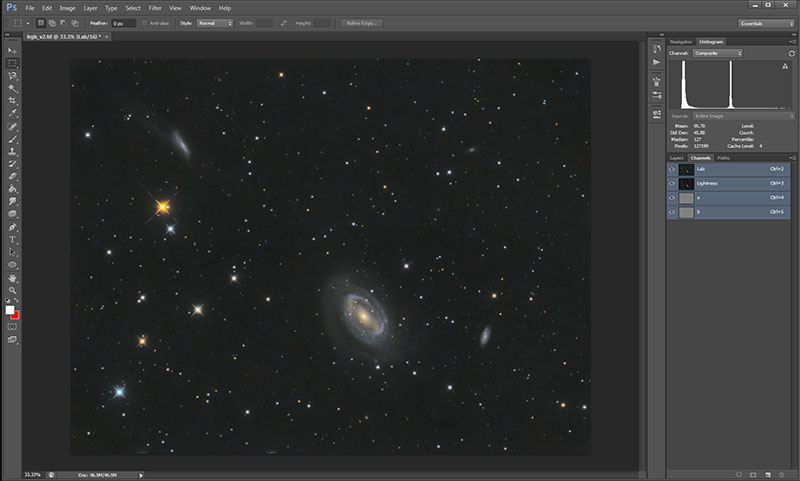
Select the Lightness Channel.

Select the Lightness Channel
Select the L data that you have also brought into Photoshop and paste it over the Lightness data. Unfortunately it is difficult to show this in an illustration. My steps are:
1) Select all the L data [ctrl]a and then [ctrl]c
2) Select the Lightness Channel in the Color Data (as above).
3) Paste in the new Luminosity Data [ctrl]v
4) View the result by selecting the Lab channel
Here is what the end result looks like:
1) Select all the L data [ctrl]a and then [ctrl]c
2) Select the Lightness Channel in the Color Data (as above).
3) Paste in the new Luminosity Data [ctrl]v
4) View the result by selecting the Lab channel
Here is what the end result looks like:
Convert back to RGB color and then adjust to taste.
Combining The Color in PixInsight Instead of Photoshop:
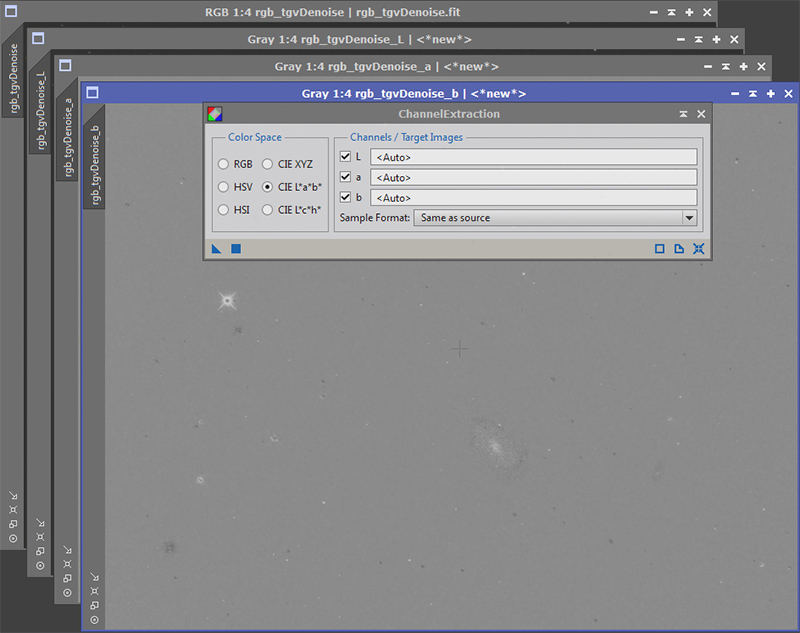
It was pointed out to me by Chris on the CloudyNight forums that the color combine using Lab color can be done in PixInsight as well. First, use the ChannelExtraction tool. Select the CIE L*a*b* option.
It was pointed out to me by Chris on the CloudyNight forums that the color combine using Lab color can be done in PixInsight as well. First, use the ChannelExtraction tool. Select the CIE L*a*b* option.
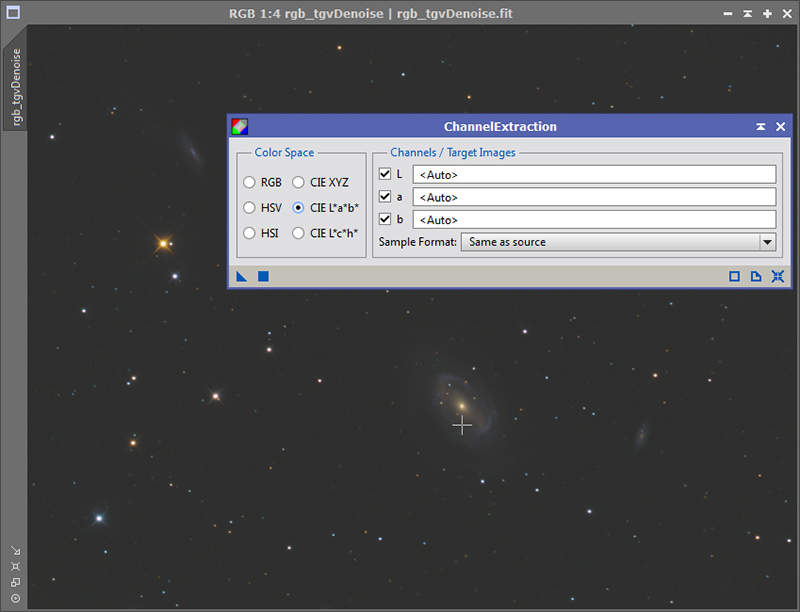
The result will be separate L, a, and b images.
Now load the luminosity file you want to combine. Using the ChannelCombination tool with CIE L*a*b* color option, select the new luminosity image you want to combine instead of what was just extracted. Then select the a and b channels that were just extracted.
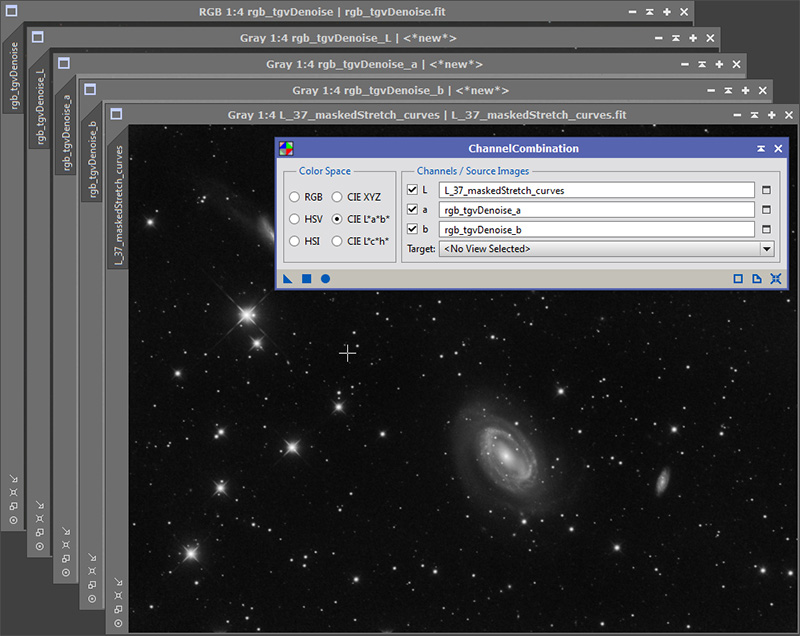
Apply the ChannelCombination process by pushing the round blue circle at the bottom left of the tool. The result will now show up in a new window.

Conclusion:
Even if you do not use PixInsight and Photoshop, the concepts that are here very much apply to other software. Remember not to make the mistakes I was making.
o My underlying color data wasn't very good.
o I wasn't color calibrating it properly.
o I was trying to saturate my data at the wrong time.
o I was stretching my color data too much.
o I was trying to combine it with my luminosity data in a poor way.
